
The Ultimate Sally Nightmare Before Christmas Beauty & Costume Guide: Makeup, Lashes, Hair & DIY Outfits

Sally from The Nightmare Before Christmas remains the undisputed queen of romantic, gothic Halloween style.
Her mismatched patchwork silhouette, porcelain-blue complexion, and oversized cartoon eyes strike the sweet spot between eerie and charming.
Creating a show-stopping Sally transformation does not require expensive theater prosthetics or professional FX training.
With the right foundation blending, clean stitch placement, and bold lashes, you can bring this iconic ragdoll to life.
Whether you are designing an editorial cosplay, prepping for a Halloween party, or tailoring a comfortable DIY outfit for your little one, this step-by-step masterclass covers every detail from head to stitched hemline.
Materials & Essentials Checklist
Before diving into the application, gather your core kit to ensure clean lines, vibrant colors, and long-lasting wear throughout the night.

Face, Body & Makeup
- Water-activated face paint: Pale cyan or light powder blue
- Foundation mixer: Fair/porcelain liquid foundation (to soften the face paint for a wearable finish)
- Contour powder: Matte slate grey or muted navy shadow
- Eye base: Matte lavender, plum, and charcoal eyeshadows
- Liners: Waterproof matte black liquid liner pen and a creamy white eyeliner pencil
- Setting products: Translucent setting powder and an industrial-strength makeup sealing spray
- Lashes: Extreme-length, spiky faux mink strip lashes and clear brush-on lash glue
- Lips: Deep berry or muted brick-red matte lipstick
Hair & Wardrobe
- Wig: 28–32 inch straight synthetic red wig with a center part (or 2 skeins of crimson chunky acrylic yarn for a DIY wig)
- Costume fabrics: Printed patchwork dress or solid cotton fabrics in mustard yellow, teal blue, salmon pink, and solid black
- Detailing: Black dimensional puff paint or black embroidery floss
Step 1: Flawless Blue-Green Ragdoll Base
The secret to a stunning sally nightmare before christmas face is avoiding thick, caked-on body paint that cracks after an hour of talking and smiling.
Aim for a soft, breathable porcelain finish with gentle blue undertones.
Prepping and Balancing the Skin

- Start with clean, exfoliated skin. Apply an oil-free, mattifying primer to lock in hydration and form a protective barrier against pigments.
- In a small palette or on the back of your hand, mix a pea-sized drop of pale cyan water-activated face paint directly with two pumps of your usual fair liquid foundation. This creates a soft ragdoll tint that looks smooth in photos rather than chalky.
- Buff the mixture evenly over your face, ears, neck, and collarbones using a damp beauty sponge.
- Immediately press translucent setting powder over the entire surface with a velour powder puff to banish shine and prevent pigment transfer onto your costume collar.
Sculpting Tim Burton Hollows
- Take a small, tapered contour brush and tap into a cool-toned slate grey or muted navy shadow.
- Lightly hollow out the space directly beneath your cheekbones, working from the hairline inward toward the corners of the mouth.
- Dust the shadow along your temples, the jawline, and the sides of your nose to recreate the sharp, angular lighting of stop-motion animation.
Step 2: The Iconic Sally Eye Makeup & Dramatic Lashes
Sally’s oversized cartoon eyes are her most expressive feature.
This step uses smart optical tricks to make your eyes look wide, innocent, and doll-like.

Soft Grunge Eye Shadow Application
- Sweep a dusty lavender or muted plum shadow across your entire eyelid, blending it upward just past the natural crease toward your brow bone.
- Take a small pencil brush with matte charcoal shadow and run it along your lower lash line, keeping the perimeter soft and slightly rounded.
- Coat your lower waterline generously with a creamy, highly pigmented white eyeliner pencil. Pull the white line slightly down onto the lower lash roots—this creates the visual illusion of a giant, doll-like sclera (the white of the eye).
Applying Bold Sally Lashes & Under-Eye Accents

- Line your upper lash line with a sharp, thin stroke of black liquid liner to conceal the upcoming lash band.
- Bend your sally nightmare before christmas lashes into a slight curve, apply a thin ribbon of lash glue, and wait 30 seconds for it to become tacky.
- Press the spiky faux mink lashes as close to your natural upper lash roots as possible, pressing the center down first before securing the outer corners.
- The Stop-Motion Animation Trick: Instead of applying lower mascara, grab your fine-tip black liquid liner pen. Hand-draw 4 to 5 distinct, vertical, tapered lash spikes onto the skin directly below your white-lined lower waterline. This gives the distinct animated ragdoll eye look seen on screen.
Step 3: Drawing Signature Stitches & Doll Lips
Precision is everything when mapping out Sally’s seams.
The goal is to make the stitches look like structural threads holding your features together.

Anatomical Stitch Mapping
- The Forehead: Draw a clean, diagonal black line starting at your hairline on the left and descending toward the middle of your right brow.
- The Cheek & Jaw: Draw a line cutting vertically down the right cheek, skimming past the outer corner of your mouth, and stopping just above the jawline.
- The Collarbone: Run a horizontal seam along your right collarbone to tie the neck into the look.
- Drawing Cross-Threads: Use your black liquid eyeliner pen to draw uneven, alternating perpendicular tick marks across the line. Vary their angles slightly—ragdoll seams are hand-sewn, not laser-printed.
- The 3D Depth Trick: Take a fine detailing brush with white cream paint and trace a hairline highlight alongside the bottom edge of every black thread. This subtle highlight tricks the eye into seeing real thread sitting on top of raised skin.
Perfecting the Stitched Doll Mouth
- Line and fill your lips with a rich, matte berry or muted brick-red lipstick.
- Using your waterproof black liquid liner, extend the natural outer corners of your mouth straight out by approximately half an inch.
- Draw 2 small vertical stitch tick-marks through these black line extensions on each side, seamlessly integrating your mouth into your ragdoll seam line.
Step 4: Styling Vibrant Crimson Sally Hair
Long, flowing crimson locks are central to the silhouette.
Depending on your personal aesthetic and budget, you can execute this with a realistic synthetic lace wig or a classic storybook yarn headpiece.

Option A: The Sleek Synthetic Red Wig
- Look for a 28- to 32-inch poker-straight synthetic wig in a deep auburn-crimson shade with a distinct center part.
- If the wig arrives with high-shine plastic fibers, generously mist the strands with dry shampoo or dust them with cornstarch, brushing thoroughly to achieve an authentic matte, editorial texture.
- Using low heat (if heat-resistant) or a paddle brush, smooth the hair so it cascades flat and straight behind your ears, letting your face paint and stitched collarbones take center stage.
Option B: The DIY Ragdoll Yarn Headpiece
- If you want a playful, tactile look that feels straight out of a craft room, start with a dark red or black open-weave mesh crochet beanie.
- Cut thick, bulky acrylic crimson yarn into uniform 60-inch strands.
- Fold each strand in half, thread the loop through the holes along the perimeter of the beanie, and pull the tails through the loop to create a secure knot.
- Continue until the cap is full, then trim the bottom edges to a uniform, blunt length.
Step 5: DIY Sally Patchwork Costume Construction
Sally’s dress is an asymmetric patchwork masterpiece featuring distinct geometric prints and mismatched color blocking.

Sourcing & Color Blocking
To build or sew your dress, source fabrics with the four essential panel styles:
- Mustard Yellow: Adorned with hand-drawn black swirls and small irregular polka dots.
- Teal Blue: Clean, solid turquoise patches.
- Solid Black: Broken up with thin, hand-drawn vertical white pinstripes.
- Salmon/Brick Pink: Solid or textured muted coral tones.
Assembling and Detailing
- Cut the fabrics into irregular, mismatched polygons, trapezoids, and triangles.
- Stitch or fabric-glue the panels together into a shift-style or A-line sleeveless mini dress with jagged, uneven hemlines and jagged sleeve cuffs.
- Finish every seam junction by piping black dimensional fabric puff paint along the edges in bold cross-stitch patterns. The raised paint mimics heavy embroidery floss and catches the light beautifully.
Step 6: Easy Adaptations for Kids & Toddlers
Creating a sally nightmare before christmas kids costume or styling an outfit for a toddler requires balancing the character’s aesthetic with warmth, comfort, and sensitive-skin safety.
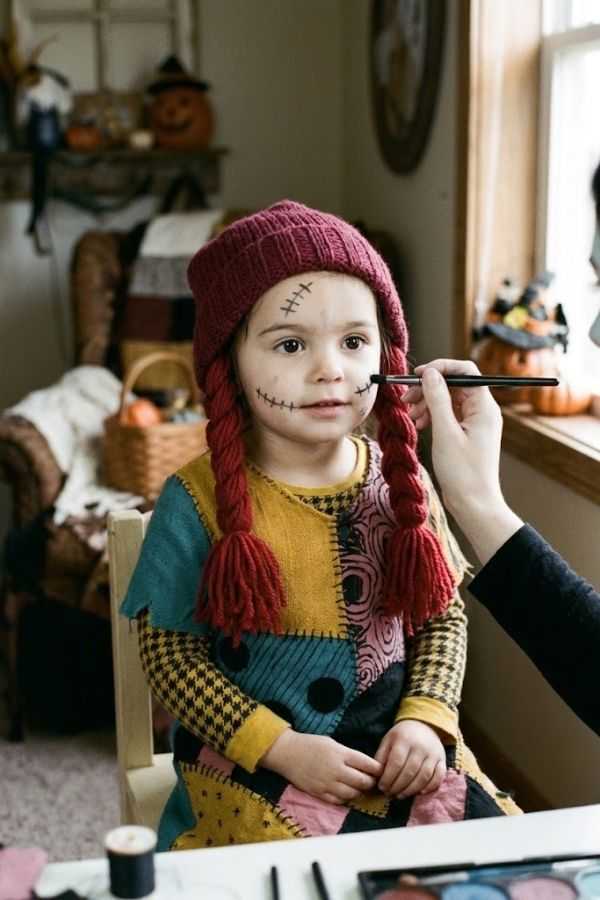
Gentle, Kid-Safe Makeup Alternatives
- Skip Full-Face Paint: Toddlers often touch or rub their faces. Instead of full-face blue base paint, use their natural skin tone.
- Gentle Cosmetic Markers: Use a dermatologically tested, water-based black makeup pen to draw just 2 small, cheerful stitches: one tiny cross-stitch on the forehead and one across a cheek.
- Eye Safety: Skip false lashes, heavy eye shadow, and eyeliner entirely. A light swipe of gentle, berry-tinted lip balm completes the look safely.
Layering Warm & Comfy Toddler Costumes
- The Base Layer: Halloween nights are often chilly. Start with a warm, long-sleeve cotton thermal shirt and matching leggings in solid yellow, teal, or black.
- The Slip-Over Tunic: Construct Sally’s dress as a lightweight, loose-fitting cotton pinafore or sleeveless tunic that slides effortlessly over the warm base layers. This ensures quick changes and fuss-free bathroom breaks.
- Soft Beanie Over Wig: Wigs are notorious for itching and sliding off small heads. Swap the synthetic wig for a hand-knit red yarn beanie or soft headband with yarn pigtails. It keeps their ears warm while maintaining the iconic ragdoll silhouette.
Setting, Removal & Long-Lasting Wear
To keep your makeup pristine through long parties, trick-or-treating, and photo sessions, finish with three generous mists of barrier-setting spray, letting each layer dry completely.

Avoid touching the seam lines around your mouth while eating—sip drinks through a straw to protect your lip stitches.
When the night is over, dissolve the water-activated paints and waterproof liner using an oil-based cleansing balm or micellar water before your standard evening skincare routine.
With this complete roadmap, you are ready to bring Halloween Town’s most beloved heroine to life with authentic detail, comfort, and timeless gothic style.