Grey Blending Highlights: The Ultimate Guide to Going Gray Gracefully

Your complete guide to beautifully blending grey hair with expert insights and proven techniques
Grey blending highlights have exploded in popularity lately, and honestly, it makes total sense.
Nobody wants to be stuck at the salon every three weeks anymore.
The harsh root lines, that dreaded skunk stripe when your color grows out—it’s exhausting.
What women really want is something that looks natural, doesn’t need constant upkeep, and lets them embrace their silver without looking washed out.
That’s the whole point of grey blending highlights. It’s seriously a game-changer.
What Exactly Are Grey Blending Highlights?

Here’s the deal.
Grey blending highlights are when your colorist strategically places highlights through your hair to blend your natural greys with your base color.
Instead of covering every single grey (which means you’re back in the salon constantly), you’re working with them.
The highlights and your greys create this beautiful, cohesive look together.
It’s like—instead of fighting your greys, you’re actually making them part of the whole look.
The placement is everything.
Your colorist isn’t randomly throwing foils in your hair.
They’re painting highlights exactly where your natural greys are coming in.
So when everything grows out, it looks intentional and dimensional.
Actually, it gets better with time as more silver comes through.
Why Grey Blending Actually Works
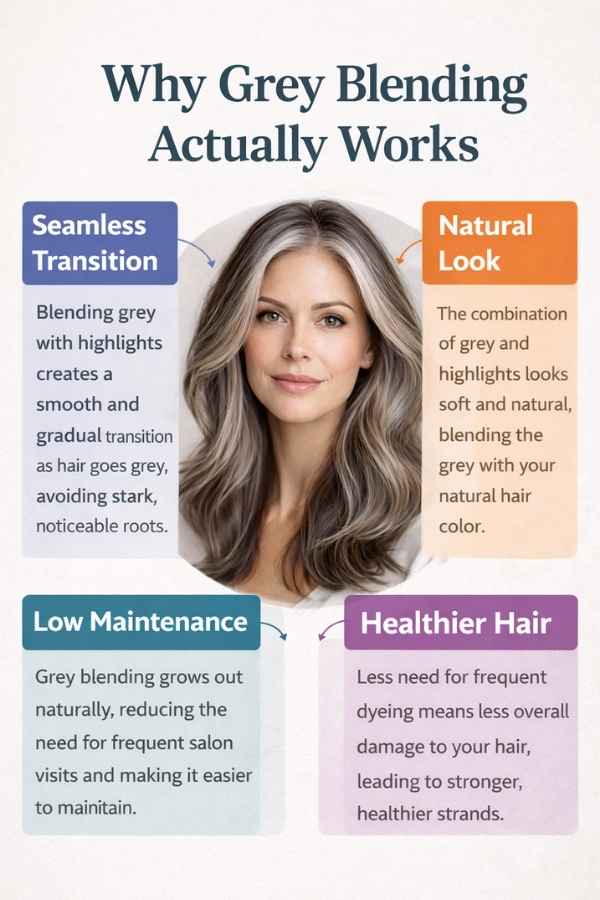
Here’s the thing about grey hair—it’s not really grey at all.
It’s white.
It only looks grey when it’s mixed in with your pigmented hair.
So when your colorist adds highlights that are lighter than your base but darker than pure white, they’re creating this gradient.
Your greys blend right into those lighter pieces. No harsh line screaming “time for a touch-up!”
The highlights basically act as a buffer between your colored hair and your greys.
When new greys grow in, they just melt into those lighter sections.
That’s why people can go from needing appointments every 3-4 weeks to every 3-4 months. And yeah, that’s actually realistic for most people.
Different Ways to Blend Your Greys
Not every grey blending technique is the same. Here’s what you’ll typically see at salons:
1. Classic Foil Highlights
This is what most people think of when they hear “highlights.”
If you’ve got about 20-40% grey and want that classic highlighted look, this is usually the way to go.
Your stylist uses foils and focuses more around your hairline and crown where greys tend to show up first.
Best for: Women with scattered greys who want a sun-kissed, dimensional look Maintenance: Every 10-14 weeks Time in chair: 2-3 hours
2. Balayage Grey Blending
If you’re going for more of a beachy, natural vibe, balayage is gorgeous.
Your colorist hand-paints the highlights instead of using foils, which gives you this really soft, lived-in look that blends beautifully with greys.
Best for: Women who want an effortless, beachy vibe with minimal upkeep Maintenance: Every 12-16 weeks Time in chair: 2.5-3.5 hours
3. Lowlights for Grey Blending

This one surprises people, but it works really well.
If you’re already more than 50% grey, sometimes adding darker pieces back in creates a better blend with whatever pigmented hair you have left.
It adds depth back into mostly-grey hair.
Best for: Women who are more than 50% grey and want to add depth back into their hair Maintenance: Every 8-12 weeks Time in chair: 2-3 hours
4. Shadow Root or Reverse Highlight
This technique is perfect if you’re actively trying to grow out your natural grey.
Your stylist adds a darker shadow at the roots and blends it into lighter ends.
When your grey grows in, it matches the lighter parts perfectly.
Best for: Women actively growing out their natural grey Maintenance: Every 12-20 weeks Time in chair: 2-3 hours
Blending Greys Into Brown Hair: What Actually Happens
Brown hair is super common, so let’s walk through what typically happens during a grey blending appointment for brunettes.
Step 1: The Consultation
A good stylist will look at where your greys are growing in. Are they concentrated in certain spots?
What percentage of your hair is grey versus pigmented?
What’s your natural base color? All of this matters for how they’ll approach your color.
Step 2: Picking the Right Tone
For brown hair, you’ll usually see caramel tones, honey blondes, or ash browns depending on your skin tone and what you like.
The key is choosing something 2-3 shades lighter than your base that still looks natural with your coloring.
Quick guide for brown hair:
- Dark brown base (Level 3-4): Caramel or light brown highlights (Level 6-7)
- Medium brown base (Level 5-6): Honey blonde or golden brown highlights (Level 7-8)
- Light brown base (Level 6-7): Champagne or beige blonde highlights (Level 8-9)
Step 3: Strategic Placement
This is where experience really counts. Your colorist puts more highlights where you have more grey (usually hairline, part, and crown) and fewer in areas with less grey.
They’ll use a weaving technique that grabs both grey and pigmented hairs in each foil. That’s what makes the blend look so seamless.
Step 4: The Toner
After highlights process, your stylist should always use a toner. This is really important. It gets rid of any brass and helps everything blend together—the highlights, the greys, and your base color.
For brown hair, you’ll usually get a neutral or ash toner to keep things looking natural.
Common Grey Blending Mistakes to Avoid
Here are the biggest screw-ups people make:
Mistake #1: Going Way Too Light Right Away
Look, I get wanting to blend those greys immediately. But jumping from dark brown to platinum in one sitting? You’re going to fry your hair and it’s going to look harsh. Sometimes you need 2-3 sessions to get where you want to be. It’s worth being patient.
Mistake #2: Trying to “Blend” with Box Dye
Please don’t do this. Box color covers everything uniformly—every single strand. That’s the opposite of blending. You’ll just end up back where you started, needing constant root touch-ups. Grey blending needs strategic lightening, not all-over color deposit.
Mistake #3: Skipping Proper Haircare
Grey hair feels different than pigmented hair—it’s coarser and more wiry. Once you start grey blending, you need to step up your haircare game. Purple shampoo to keep brass away, deep conditioning weekly, heat protectant every time you use hot tools. It matters.
Mistake #4: Booking with the Wrong Stylist
Not every stylist knows how to do grey blending well. This takes specific skills—color theory, strategic placement, understanding how hair grows out. Ask to see before-and-after photos of their actual grey blending work before you book. Not just general highlights—specifically grey blending.
What to Expect: Timeline and Upkeep
Here’s what the grey blending journey actually looks like:
First Appointment: Plan on 2-4 hours. This is where everything gets set up. You’ll walk out with highlights that blend your greys, but know that this actually gets better over time.
First Few Months: Your hair looks amazing. The blend is seamless. You’re probably getting compliments. Your greys are growing but they’re blending right into the highlights.
Around Month 3-4: Time for your first refresh. You’ll get the highlights redone, focusing on new growth and any areas that need brightening. This usually takes less time than the first appointment—maybe 1.5-2.5 hours.
Months 6-12: You’ve hit your groove. Your hair’s adapted to the routine, the blend between your greys and highlights is perfect. Most people at this point can stretch appointments to 12-16 weeks.
After the First Year: This is when you’ll decide if you want to keep going with grey blending or transition to fully natural grey. Either way, grey blending sets you up perfectly.
How Much Does Grey Blending Cost?
Let’s talk money. Prices vary by where you live and the salon, but here’s what you’re typically looking at:
First Session: $200-$400+ depending on hair length and how much work needs to be done
Maintenance Visits: $150-$300+ every 10-16 weeks
Products for Home: $50-100 every couple months for purple shampoo, deep conditioner, glosses
Yeah, it’s an investment. But compare it to traditional color every 3-4 weeks at $100-150 each time. Grey blending actually saves money long-term. Plus you’re saving time—no more emergency salon visits before events.
Products That Actually Help
Here are products that really work for grey blending maintenance:
Purple Shampoo: Fanola No Yellow or Redken Color Extend Blondage work great. Use once or twice a week to keep highlights from going brassy. Don’t use it every day unless you want purple hair.
Deep Conditioning: Olaplex No. 8 or K18 Leave-In work really well. Use weekly to keep both your highlights and natural grey soft and manageable.
Gloss Treatments: Get an in-salon gloss every 6-8 weeks between highlight appointments. Keeps your color fresh and adds shine. At home, dpHUE Gloss+ is solid.
Heat Protectant: Living Proof Perfect Hair Day Heat Styling Spray. Grey hair is more fragile and heat damage shows up faster. Always use protection.
Styling: A good texture spray like Oribe Dry Texturizing Spray helps grey hair look fuller. Grey hair tends to be finer, so texture makes a big difference.
Grey Blending for Different Hair Types
What works for one person won’t necessarily work for another. Here’s what matters for different hair types:
Fine, Straight Hair: Needs finer, more subtle highlights. Too chunky and it looks stripey. The goal is soft, diffused color that adds dimension without overwhelming thin hair.
Thick, Coarse Hair: Can handle bolder, chunkier highlights. Often looks best with a mix of foils and balayage for maximum dimension.
Curly or Textured Hair: Balayage usually works best because it looks natural as the curls move. Also needs careful processing because curly hair can be more fragile.
Previously Colored Hair: If you’ve been coloring your greys for years, that existing color matters. Sometimes you need color correction first to get rid of buildup and create an even base.
When Grey Blending Isn’t the Right Choice
Let’s be honest about when this doesn’t make sense:
You barely have any grey: If you’re less than 10% grey, regular highlights or a gloss might be better. Grey blending really shines when you’ve got at least 15-20% grey.
You want zero grey visible: Some women just aren’t ready to see any grey, and that’s totally fine. If that’s you, stick with full coverage color.
Your hair is really damaged: Need healthy hair to start with. If your hair is breaking or super processed, focus on repair first before any lightening.
Budget is really tight: Grey blending needs quality products and a skilled colorist. If you can’t invest in both the service and the upkeep, you might be disappointed.
Transitioning from Full Coverage to Grey Blending
One of the most common questions: “How do I stop covering my greys and start blending?”
Here’s how it typically works:
Months 1-2: Your stylist stretches your current color as long as possible while adding subtle highlights around your hairline and part. This starts the blend while keeping coverage.
Months 3-4: Next appointment, more highlights go in while less base color gets applied. You’ll start seeing more natural grey coming through.
Months 6-8: Base color is way reduced now, mostly just highlights. Your natural grey blends beautifully with the lighter pieces.
Months 9-12: Most people are fully transitioned. Just maintaining highlights and letting natural grey shine.
This slow approach prevents shocking changes and gives you time to adjust to seeing your grey.
Real Stories from Women Who Made the Switch
Some inspiring transformations:
Jennifer, 52, Dark Brown Hair: Had been coloring every three weeks for 10 years and was completely over it.
Got caramel balayage for grey blending.
A year later, she’s only going every 14 weeks and says she feels way more like herself.

Maria, 48, Medium Brown Hair: Was terrified of looking old if she stopped covering her greys.
Tried gradual transition with golden highlights.
Six months in, posted a photo on social media and got so many compliments.
Her reaction? “Why didn’t I do this years ago?”

Linda, 61, Light Brown Hair: Wanted to go fully silver.
Used grey blending over 8 months as a bridge, now she’s rocking a gorgeous silver pixie.
The transition was so smooth her friends barely noticed it happening.

Questions People Always Ask
“Will this damage my hair?” Any lightening affects your hair, but done right by a good colorist with quality products, damage is minimal.
The key is taking care of it properly and using bond treatments during the service.
“Can I do this at home?” Honestly no. The placement, color formulation, processing it all needs professional know how. DIY attempts usually end up orange, brassy, or patchy. Worth paying for a skilled colorist.
“How long to go fully grey?” Depends on your starting point and how fast your hair grows.
Most people who want to go fully grey get there in 12-18 months using grey blending as a bridge.
“What if I hate it?” Grey blending isn’t all-or-nothing.
If you want more coverage, your stylist can add a toner or gloss.
Want more grey showing? They can lighten more. It’s flexible.
“Will my grey look brassy?” Not if you take care of it.
Purple shampoo, regular glosses, not overdoing heat—that keeps your grey looking silver instead of yellow.
Where Grey Blending is Headed
Grey blending isn’t a trend—it’s become a whole movement.
More women are embracing their natural hair instead of constantly fighting it.
The techniques keep getting better too.
New placement methods, products made specifically for grey hair, more stylists specializing in it.
Things are only getting better from here.
Final Thoughts
If you’re thinking about grey blending, book a consultation with a colorist who specializes in it.
Bring photos of looks you like (and ones you don’t).
Be honest about your budget and how much maintenance you’re willing to do.
Grey blending can completely change how you feel about your hair. A lot of women say they feel more authentic and free once they stop hiding their grey.
Your greys aren’t something to hide.
They’re something to work with, enhance, and blend into your look. That’s what grey blending is all about.
Ready to try it? Find a colorist you trust, commit to taking care of your hair, and get ready to love what you see in the mirror.
Have questions about grey blending highlights? Drop them in the comments below!
Pin this post for later! Save it to your Pinterest board so you can reference it when you’re ready to book your grey blending appointment.
Share your grey blending story! Let us know in the comments how your grey blending journey is going.